A native Mac app for your 3D models

Your models.
In plain sight.

See what you’ve saved. Convert 3MF projects to another printer, one at a time or in bulk. Explore Full Spectrum colour, plan Smart Supports, and use on-device AI to rename, tag and rediscover your models.

Free to download and use.Coming soon for macOS 15 or later.

Questions or ideas? feedback@modelshelf.app

ModelShelf’s red stacked-layer app icon
.3mf.stl.obj
Three formats. One place to find your next print.
ModelShelf showing its model grid with favourites, print status, notes and tag filters, the AI Tools menu and library search, and a dual-colour wave fidget spinner selected in the inspector.
Your collection, at a glance.A real look at ModelShelf. Click the image to see it full size.
Made for your Mac
Works with your existing folders
Local previews. On-device AI.
Colour. Supports. Conversion. AI.

More possibilities
for every model.

Go from a model you like to a project you want to print, with tools for colour, preparation and a better-organised collection.

FULL SPECTRUM PRINTING EXPERIMENTAL

Four filaments.
A wider colour palette.

See your model’s estimated Full Spectrum colours in a live 3D viewer. Change a filament colour or blend recipe and watch the preview update in real time. Explore recipes that combine four filament colours through alternating layers.

  • Choose Snapmaker U1, Flashforge Creator 5 or Creator 5 Pro and enter your loaded filament colours.
  • Preview colours in real time. Rotate and zoom the model while adjusting its colour recipes.
  • Switch between Original and Full Spectrum to compare the original colours with your estimated blends.
  • Use Edit Mix for precise ratios, repeating layer cycles and target-colour matching.
  • Save a new 3MF project to open, check and slice for your printer.

For supported 3MF projects and OBJ/STL geometry. OBJ uses solid material colours, not texture images. Screen colours are estimates; actual printed blends vary.

See the live Full Spectrum viewer ↓

How it works & which printers to use ↓

SMART SUPPORTS EXPERIMENTAL

See where support
may be needed.

Inspect overhang recommendations on compatible models before slicing. Smart Supports examines downward-facing surfaces and identifies simple bridge candidates using the limits you choose.

Support recommendationsBridge candidates
  • Review highlighted areas in a rotating 3D preview.
  • Adjust the overhang angle and bridge limit for your setup.
  • Save support painting to a new project copy for your slicer to turn into supports.

For compatible, editable Bambu/Orca-family 3MF projects, including multiple plates. ModelShelf saves a separate copy and leaves your original unchanged. If a file is unsupported, use your slicer’s support tools. Always review the generated supports in the slicer before printing.

See a successful analysis in the app ↓
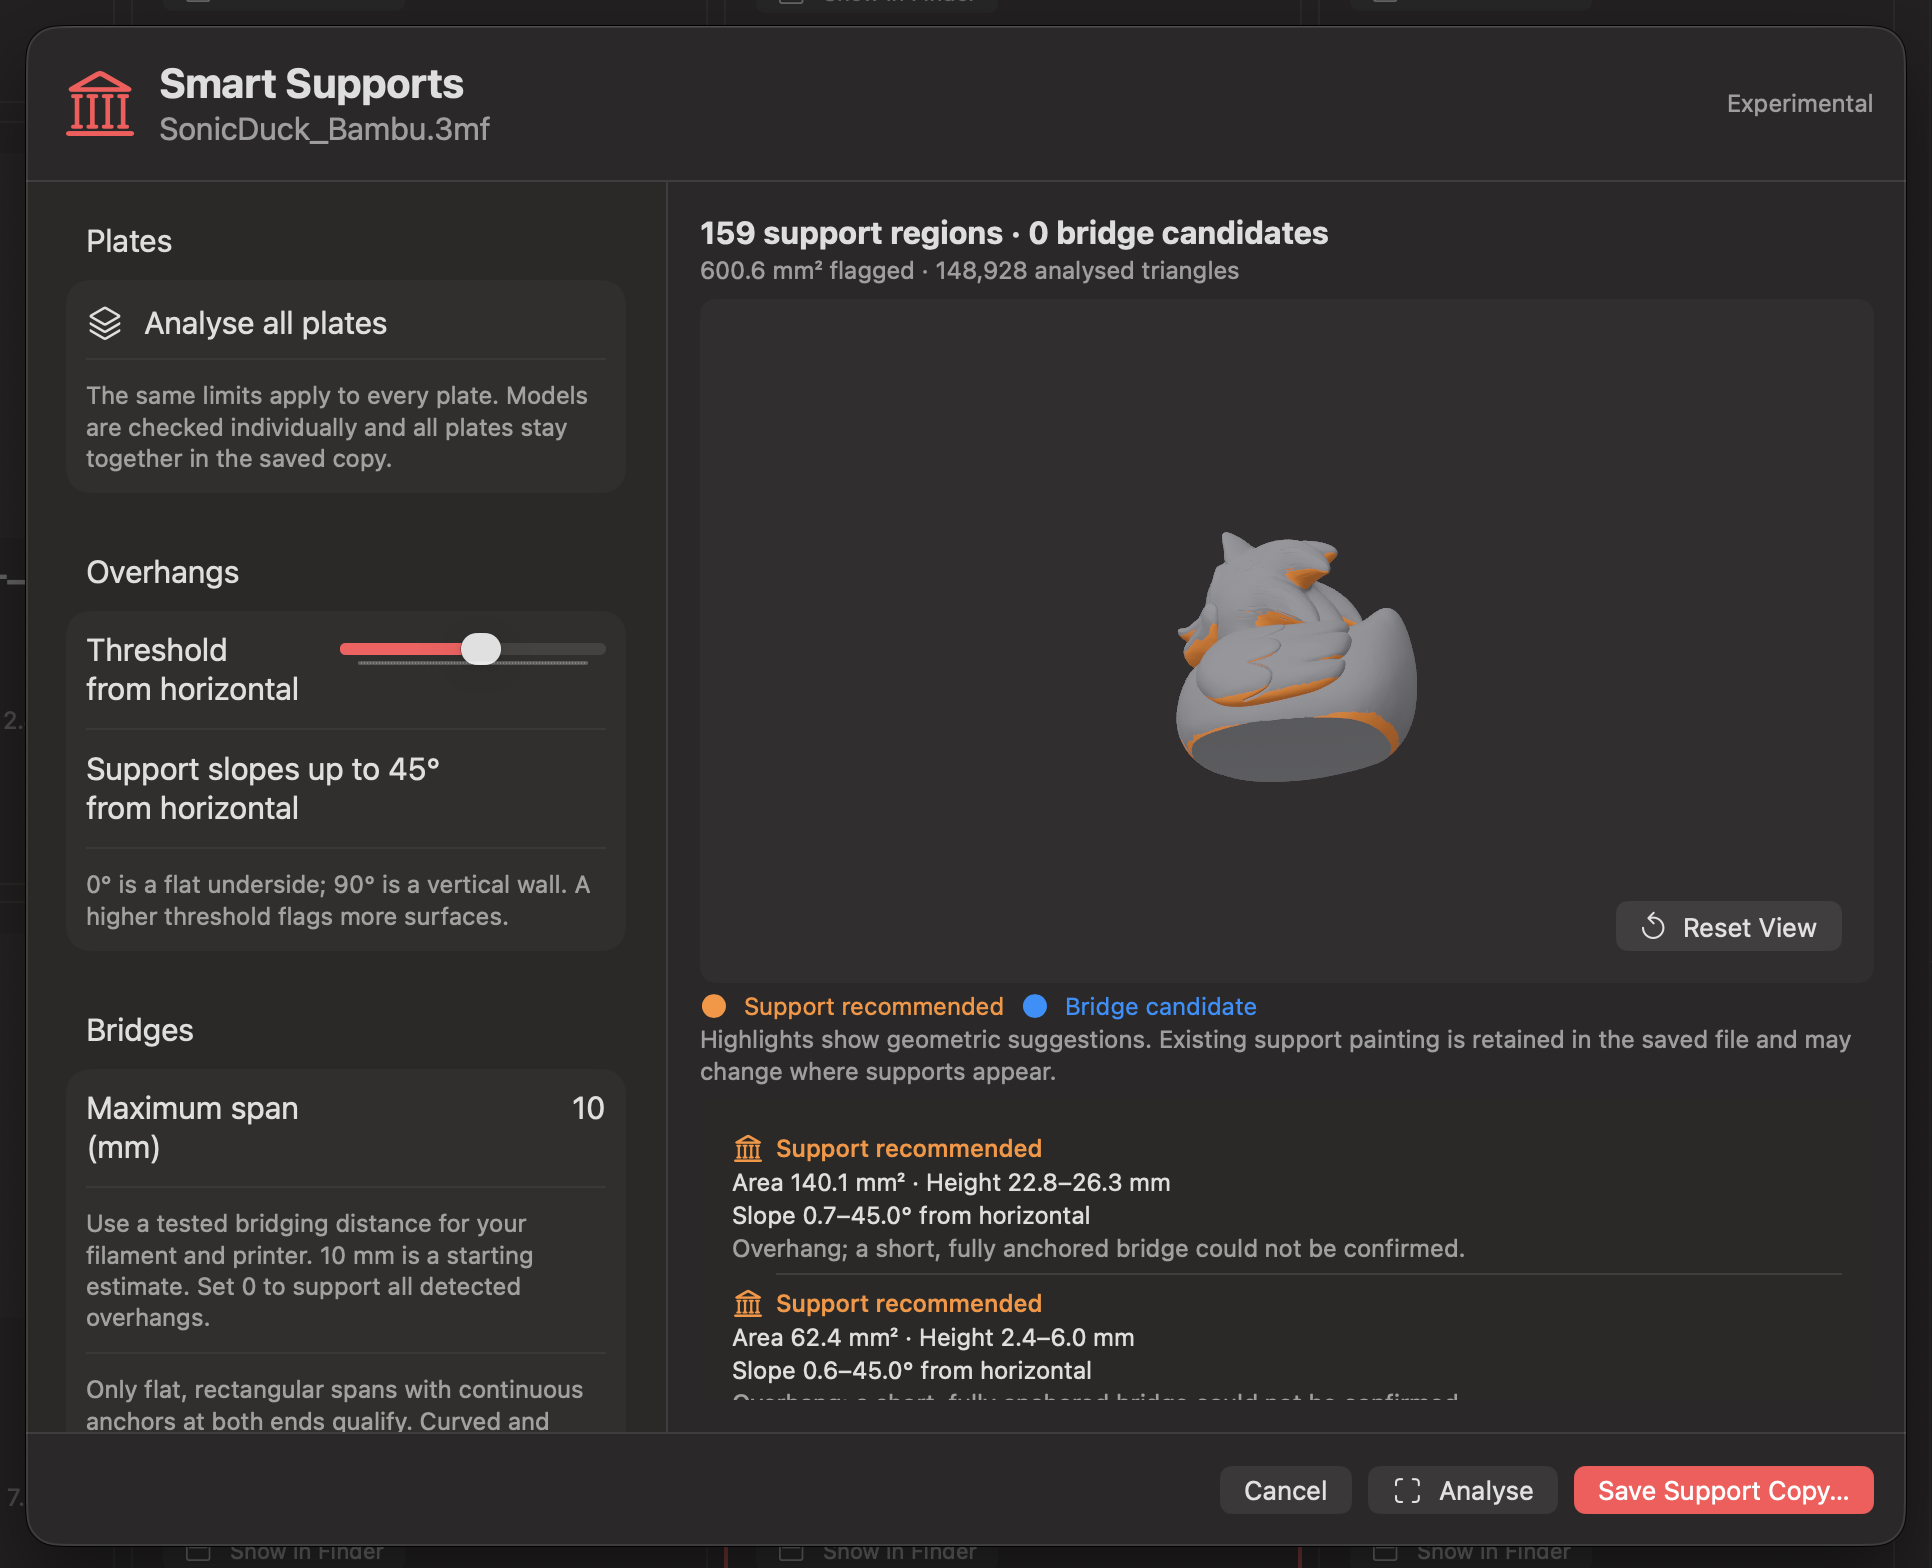
Smart Supports on a compatible model.This example shows 159 suggested support regions highlighted in orange. Review the areas, then save a support copy for your slicer to turn into actual supports. Click the screenshot to view full size.Experimental: this successful example does not mean every file is supported.
ModelShelf Smart Supports analysing SonicDuck_Bambu.3mf, with 159 support regions, zero bridge candidates, orange highlights on the model, and controls for overhang angle and bridge span.
Full Spectrum explained

More colours from the filaments you already have.

How does it work?

Thin layers of different filament colours create an optical blend. Light interacting with those layers makes them appear as another colour. The recipe controls how often each filament is used. Filament opacity, layer height and lighting all affect the result.

Does it need a special printer?

The principle is not exclusive to tool changers. Other FDM printers can use it with suitable filament-changing hardware and compatible slicing software. A single-nozzle system must repeatedly unload, reload and purge when changing colours, which can add substantial waste and printing time.

Why recommend a tool changer?

A tool-changing printer keeps each filament in its own nozzle. Frequent colour changes can therefore use much less purge material than a shared-nozzle system, making layered colour printing more practical. Priming or a tower may still be needed, depending on the setup.

Using it in ModelShelf: Full Spectrum export currently supports Snapmaker U1, Flashforge Creator 5 and Creator 5 Pro. The broader technique can work on other suitably equipped printers, but ModelShelf does not yet export Full Spectrum projects for every printer. Its screen previews are uncalibrated estimates; check a small sample print first.

Learn more about optical colour blending from Snapmaker ↗
See your Full Spectrum colours in real time.The app’s interactive 3D viewer updates as you change filament colours or recipes. Rotate and zoom to inspect your model, then switch between Original and Full Spectrum to compare. This screenshot shows the viewer in action; click to view it full size.
ModelShelf’s Full Spectrum window showing a duck model in estimated pink, blue and white blends, Original and Full Spectrum preview controls, and individual Edit Mix buttons beside custom colour recipes for a Snapmaker U1. Warnings identify noticeable colour differences.
Fine-tune each colour mix.Open Edit Mix beside a model colour to take control of its recipe. Your changes update the live model preview immediately.
  • Ratio: choose two filaments and adjust their blend in 1% steps.
  • Cycle: set how many layers of each filament repeat.
  • Match: choose a target colour and find the closest estimated mix from your loaded filaments.

Compare the illustrative layer pattern with the estimated blend. This example uses 71% Filament 2 and 29% Filament 3. Printed colours will vary; the diagram is not a sliced preview.

Click the screenshot to view it full size.
ModelShelf’s Edit Colour Mix panel with Ratio, Cycle and Match controls. Pink Filament 2 and yellow Filament 3 are blended at 71% and 29%, with a striped layer illustration and an estimated coral-coloured blend.
PRINTER CONVERSION · SINGLE & BULK

Another printer.
One file or a whole batch.

Prepare compatible 3MF projects for the printer you want to use. Choose a bundled printer and nozzle profile, or import a target profile from your own slicer project. Save converted copies while keeping your originals intact.

Included nozzle sizes: most bundled printer profiles are for 0.4 mm nozzles. Snapmaker U1 also includes 0.2 mm and 0.6 mm profiles. For another nozzle size, import a compatible 3MF project saved with that printer and nozzle selected in your slicer.

Conversion is experimental. Always check the active printer, material and process presets, then re-slice before printing.

Convert a single 3MF

Select a model, choose its destination printer and nozzle, review the transferred settings, and save a new project copy.

Bulk convert your selection

Select multiple 3MF files and choose Convert… in the selection bar. Pick one target printer and an output folder, then convert the batch without repeating the setup for every file.

Review each result

See which copies were saved and any notices for each file. A file that cannot be converted does not stop the rest. Existing files are never overwritten.

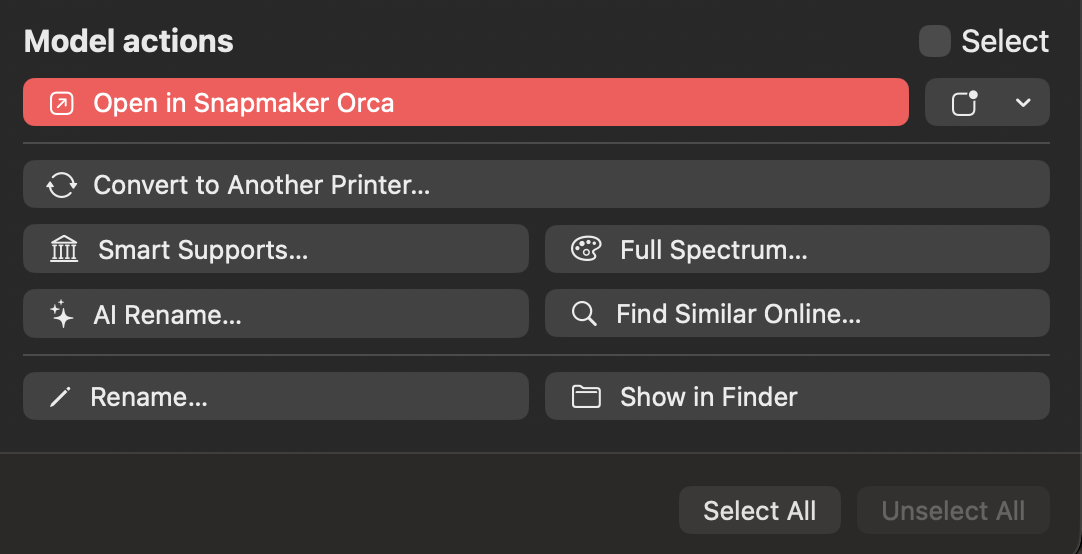
ModelShelf’s compact Model actions panel, with Open in Snapmaker Orca, printer conversion, Smart Supports, Full Spectrum, AI Rename, Find Similar Online, Rename and Show in Finder.
Your model tools, together in one tidy panel.
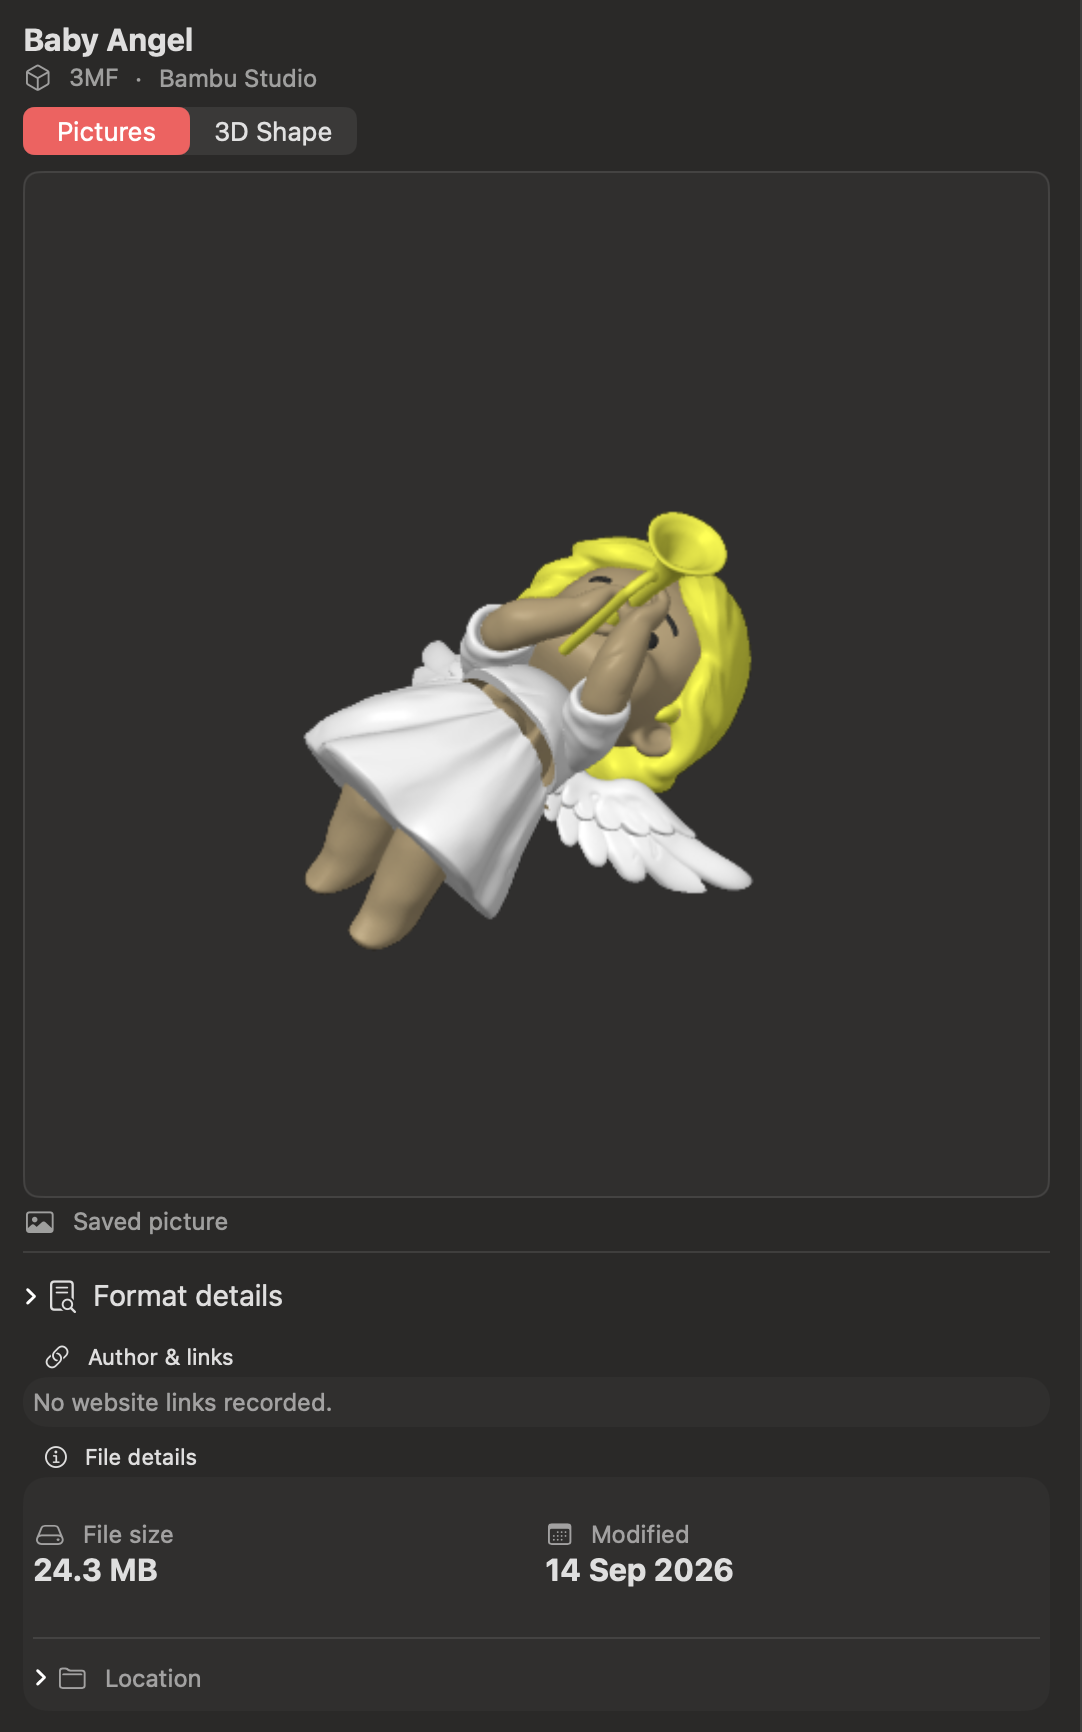
ModelShelf’s updated inspector showing the Baby Angel model, Pictures and 3D Shape controls, a saved colour preview, collapsed format details, author links and file information.
A closer look at your model, with details within reach.
Apple Intelligence · On your Mac

Better names. Useful tags.
Models you can find again.

Use the model’s preview and available details to get useful suggestions. Review and edit them before applying names, saving tags or descriptions, or starting a web search.

Rename one model. Or a whole selection.

AI Rename suggests descriptive filenames for your STL, 3MF and OBJ models. Select a batch, review the proposed names, edit the ones you want, and apply your choices.

Prefer your own name? Manual Rename is always available. File extensions and folders stay intact, and associated OBJ materials and textures keep their existing names.

Give your models useful tags.

Generate suggestions such as “boat”, “toy” or “multicolour” from the preview and descriptive metadata. Edit, remove or add your own tags before saving, then use them to search and filter your collection.

Suggestions are saved only when you choose. Your model files stay unchanged.

Prepare your collection for search.

Choose Prepare AI Search… to generate missing descriptions for models across the current folder scan. Review the wording and save only the descriptions you want.

Library searches then use those saved words locally, without running AI every time you type. Try searches such as “red starfish” →

Find similar models online.

AI helps describe the selected model for a web search. Refine the wording, then search across the web or focus on MakerWorld, Printables, Thingiverse or Thangs.

Only your reviewed search text goes to Google. Your model and its preview are not uploaded. Results are related by description, rather than verified shape matches. You can also save your reviewed search terms for future library searches.

AI suggestions run locally and require macOS 27 or later with Apple Intelligence enabled on a supported Mac. Manual renaming, tags, descriptions and search remain available without AI. See requirements →

New ways to organise your collection

Find the right model.
Keep the details that matter.

A guided start, editable tags, more useful searches and backups for the notes and details you’ve saved.

A guided start

Get settled in six steps.

The setup guide helps you choose a folder, explore the grid and list views, understand printer conversion and discover the optional model tools.

Shown on first use, easy to skip and available again from Help → Setup Guide… whenever you need it.
Your own labels

Tag it your way.

Add tags by hand or ask on-device AI for suggestions. Review and edit them before saving. A tag indicator makes tagged models easy to spot in grid and list view.

Search and filter by tags. Combine a tag with favourites, print status and the STL, 3MF or OBJ tab. Notes and saved search descriptions stay alongside your collection details.
Keep a safety copy

Back up your collection details.

Use File → Back Up & Restore… to save notes, favourites, print status, tags and AI search descriptions from all folders recorded in your collection database.

Review before restoring. See the backup date and entry count. Restoring replaces the current details and saves an automatic safety copy first. Model files, printer presets and app settings need separate backups. How restore works →
Less searching. More making.

You saved it for a reason.
Find it again.

From a handful of favourites to folders within folders, give every model a little more visibility.

See the model, not just its name.

Browse picture previews in a grid or a sortable list. Zoom the thumbnails to suit you, inspect a model’s 3D shape, and keep STL, 3MF and OBJ files in their own tabs.

Your view, remembered. Window size, layout and preview sizes stay how you like them.

Keep the good stuff.

Compare file contents using SHA-256 hashes calculated as needed. Choose a protected copy to keep, then check the extras you want to remove. Review your selection before moving files to the macOS Trash.

Exact copies, in the same format. OBJ checks include referenced materials and textures. Similar shapes or projects with different settings are not treated as exact duplicates. Nothing is selected for removal automatically.
Fits the way you already work

Your folders.
Your slicers. Your choice.

No need to rebuild your collection. Start with the model files already on your Mac.

01 / CHOOSE

Point it at a folder.

Include subfolders and let ModelShelf separate mixed STL, 3MF and OBJ collections into their format tabs.

02 / EXPLORE

Find what you want.

Search names, tags, authors, notes or saved descriptions. Filter your collection, change the view, or sort by name, folder, size and date. Inspect saved pictures and supported 3D geometry.

03 / MAKE

Take it to your slicer.

Open a model in an installed slicer, reveal it in Finder, or copy its location. Check multiple files when you want to work in batches.

A few useful details

Before you
make room.

What ModelShelf does, and where your slicer takes over.

How much does ModelShelf cost?

ModelShelf is free to download and use. The download is coming soon.

Which files can I browse?

ModelShelf browses 3MF, STL and OBJ files. It reads saved 3MF pictures where available and generates shape previews for supported geometry. OBJ material libraries and textures are tracked as associated files. Complex or unsupported files may have limited previews.

Will Smart Supports work with every file?

No. Smart Supports is experimental and is not compatible with every file. It analyses supported, editable Bambu/Orca-family 3MF projects with valid, closed meshes. Mesh errors, unsupported modifiers or slicer features, cuts through detailed painting, and files beyond its size limits can stop analysis. A working model preview does not guarantee compatibility.

If a project cannot be analysed safely, ModelShelf explains the limitation and leaves the original unchanged. Use your slicer’s support tools for that model. Successful analysis still needs review in the slicer before printing.

Does it replace my slicer?

No. ModelShelf helps you browse, organise and prepare model files. Your slicer still handles the final printer settings, toolpaths and printing workflow. Open converted projects in the target slicer, check its presets and re-slice.

Are removed files permanently deleted?

No. Checked files go to the macOS Trash after a confirmation, so you can recover them through Finder. Associated OBJ materials and textures are kept because other models may share them.

What does the AI need?

AI Rename, tag suggestions and AI-generated search descriptions need macOS 27 or later and an Apple Intelligence-capable Mac with Apple Intelligence enabled and its model ready. Standard browsing works on macOS 15 or later. Manual renaming, tags, descriptions and library search remain available without AI.

Will “red starfish” find a model with an unhelpful filename?

Yes, if both words are present in that model’s tags, saved description or other searchable details. Prepare AI Search… can suggest descriptions from previews and descriptive metadata; you review and save them first. You can also enter your own words or save reviewed terms from Find Similar Online. Search itself matches saved text, so it does not guess synonyms or recognise every object automatically. Your current format tab and filters still apply.

Does a collection backup include my model files?

No. It contains notes, favourites, print status, tags and saved AI search descriptions, together with the file information used to reconnect them. Back up the model files, printer presets and app settings separately.

Restore is intended for the same original files at their existing locations on this Mac. Moving or replacing files, or copying them to another Mac, can prevent their details reconnecting. Restoring replaces rather than merges collection details. ModelShelf validates the backup and saves the previous database as a safety copy before replacing it; if that copy cannot be saved, restore stops. You can choose the safety copy to undo the restore.

Does my collection leave my Mac?

Previews, tags, saved search descriptions and AI suggestions are processed locally. Collection backups are saved to a location you choose; a cloud-synced folder may be synced by its own service. Find Similar Online opens Google in your browser using the search text you review; it does not upload the model or its preview. Opening author links and other websites uses your browser as usual. Read the privacy policy for access and data details.

Can I convert several files to another printer at once?

Yes. Check the 3MF files you want and choose Convert Checked. Select one destination printer and nozzle, review the settings and choose an output folder. ModelShelf saves separate copies and reports the result for each file. Batch printer conversion supports compatible editable 3MF projects; STL and OBJ files are excluded. Check the converted projects in your slicer and re-slice before printing.

Which nozzle sizes are supported?

Most bundled conversion profiles use a 0.4 mm nozzle. Snapmaker U1 includes 0.2, 0.4 and 0.6 mm options. You can add another nozzle configuration by importing a compatible editable 3MF project from your slicer with the destination printer, nozzle, process and materials configured. This applies to both single-file and bulk conversion. Choose a profile that matches the nozzle fitted to your printer.

Can I convert any 3MF to any printer?

Conversion currently works with supported, editable Bambu/Orca-family projects and compatible target profiles. Some projects and settings need manual work in the slicer. ModelShelf saves a separate copy and reports unsupported cases; it does not guarantee every project or printer combination.
Help shape ModelShelf

Your feedback is welcome.

Found a bug? Have an idea, a question or a printer you’d like supported? Get in touch.

Free to download.
Free to use.

A home for your model collection, with no purchase or subscription required.

ModelShelf is coming soon

macOS 15 or later. AI features require macOS 27 and Apple Intelligence. Download details will be announced here.